

20 Plus… F150 4×4 i6 4.9l…Link https://www.youtube.com/watch?v=hWEemCX6lrI&list=PL5q1n3MQ9IDuMUNndpiil7cTjzh5ghJ9a
It all began when I decided I needed a 4X4 truck to navigate some local roads as bad weather made them less than passable. One truck ad led to another, and I found myself with a 4×4 truck with a no start condition where the distributor rotor is not turning. These trucks have a phenolic timing gear (fiber composite) that sometimes will lose teeth and thereby connection with the crankshaft gear. . Therefore, I pulled the distributor cap and turned the crankshaft with a wrench on the damper pulley to check for rotor movement. There was no movement. Proper oil changes and moderate rpms may have added more miles to the already 158000…Not bad for a 28 year old truck, as of this writing.
I then began removing everything that looked like it would be in the way of removing the timing cover. However, I first removed the distributor and checked the gear just to make sure it was not the problem… it was not. Next on the removal list was the radiator which called for the removal of the hoses and the two bolts holding it to the front support. While I was at it I decided to remove the A/C condenser and the four bolts and two line connections. I removed the serpentine belt and the grille as well. With these things out of the way I now had ample room to tackle the infamous fan clutch– on my way to remove the water pump.
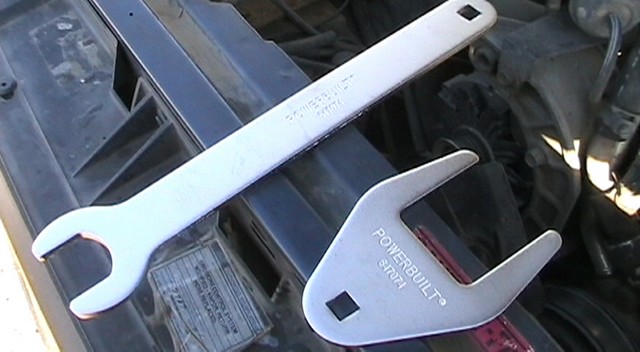 The fan clutch removal required buying a special tool (Ford is famous for special tools) that I did not carry in my tool arsenal. I will include a link at the end of this article for the tool I purchased. By using this tool I was able to remove the big nut in a counter clockwise direction, and the fan and clutch assembly just unscrewed from there. After removing four water pump pulley bolts and pulley, I removed the water pump. Now I was able to get to the crankshaft damper pulley and then the timing cover.
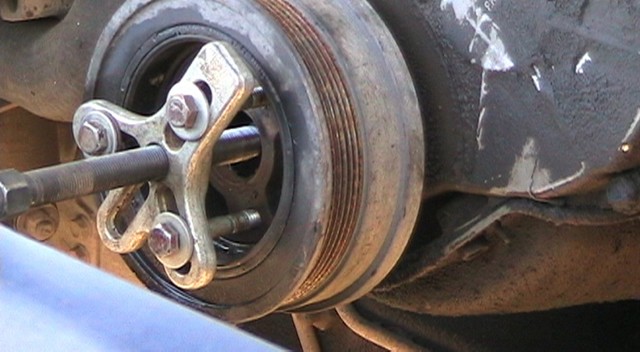 The damper pulley bolt was a stubborn one and I ended up using an air impact wrench to loosen it. My pulley
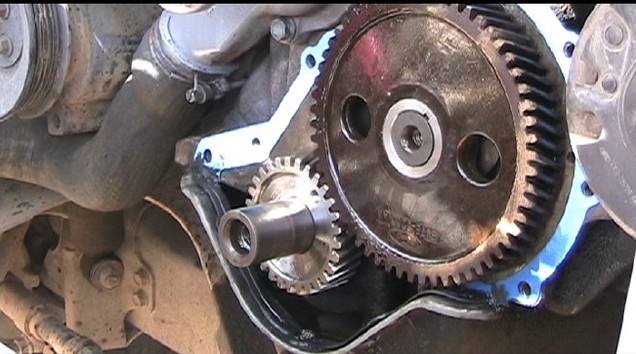
 removal tool made short work of the damper pulley, exposing the full view of the timing cover. A few more loosened bolts and the timing cover was off, exposing the timing gears. Yep, the phenolic (fiber) gear had a lot of stripped teeth. Alas, I believe I was looking at the no start problem…fixing it was another issue. The fiber gear needed to come off, and you guessed it, I needed another Ford special tool. There was no special tool available for sale anywhere.
 I decided to try something, knowing that a normal puller would just slip off the fiber gear. I drilled two 5/16in holes close to the metal part of the gear, and in the meaty part of the fiber. I drilled these holes all the way through till I felt the bit touch the block. Using a 3/8in. tap I proceeded to tap the holes for my trusty puller bolts…the same one I used to pull the flywheel damper pulley. I wanted as many threads as I could get so I tapped the holes all the way to the block. I installed the puller and carefully proceeded to pull the gear off. POP, was the sound I heard of the gear finally breaking loose.
 To my surprise, the gear came off without any issues. I then pulled the crankshaft gear…no issues there either. I was lucky to find a NOS (new old stock) ford timing gear set. The book recommends installing the gears as a matched set, though I do not see why, as I believe the metal gear will not wear as much as the fiber one it mates with. I made sure the dots were lined up with each gear as I pressed first the fiber and then the crank gear on. I used a bolt and socket to pull each gear on. I did the fiber gear first, and then I did the metal crank gear. I rechecked the dots for alignment before I installed the new gaskets and timing cover.
Finally, I put everything back together in the reverse order. I put water in the radiator and started the engine. The engine started and idled on the first try, but not before I figured out that the clutch starter bypass was not working. That is explained in another video. I have included the videos of my repair below. I have also included some links to the tools I used in this repair. This was quite an involved repair and if you do not trust your skills then I recommend having the work done by a professional. By reading this and watching the videos you will have the knowledge of what the mechanic is doing to your vehicle. As always, thanks for reading and watching the videos. Bye for Now!