
Fix A Broken Chevy HHR inside Door Handle
 My wife gave me this Chevy HHR door handle one evening. I had no idea what I was holding, much less the HHR driver’s side door handle. I mean, the car only has 60,000 miles on it. However, it was my job to fix the problem.” So how hard was it to get out of the car, I asked?” “ Not hard at all”. “I just roll the window down and the outside door handle is right there, she replied.”I have since driven the Chevy HHR, and she is correct. The car is easy to get out of, if not annoying in the fact that I had to
 keep rolling the window down and up.
I Get The Parts
Finally, I found the time to fix this annoying problem, just as soon as I got the parts from the Chevy dealership. Billy Martin, the parts manager, said that I was lucky to just replace the handle, for previously the whole door panel had to be replaced. He told me that would have cost around $500.00, as compared to around $60 for the parts now.
Ok, parts in hand I was ready to replace the Chevy front door driver’s side door handle. The replacement parts came in a box with included picture instructions. I also have a Chevy HHR shop manual that has the basic instructions for removing the driver’s side door panel.
Time To Remove The Old Handle
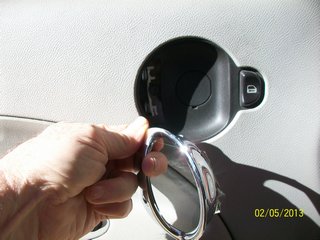
The first step was to remove the round plastic cover that is behind the door handle. It is round and just pops out. Actually, it is easier to pry out than to put back in, because when that time comes, you will have a door handle in your way. With the little piece removed, you can then see the Torx head screw located behind the plastic cover. Unscrew it and move lower on the door, where the handhold cut out is, and remove the rubber insert that is on the bottom. It just pulls out with the little tab that is on its end. Then remove the two screws that are under it. Finally, do not forget to remove the door-locking knob by unscrewing it.
Removing The Door Panel
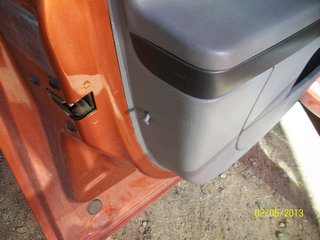 After that, remove the door panel pin shown in the picture on the left. It has a center push-in piece that needs pulling out first. Then, the rest of the little housing will pull out easily. I pried the whole thing out using a small screwdriver, but that is probably not the way to do it. By removing this pin, I was able to use a large screwdriver to pry the panel back enough to revel the panel fasteners.
I used a big screwdriver, carefully moving, prying along the panel until it seemed tighter, telling me that I was close to the next fastener. I then used a door pry tool to unfasten that fitting and moved on to the nesx one. It became easier as I went along, although the area around the speaker was quite tight. I found that my hands did a better job than the tool, and I just popped the rest of the panel out. I gave it a quick straight out pull, not sideways, and the panel came loose in a hurried fashion.
Still More To Remove
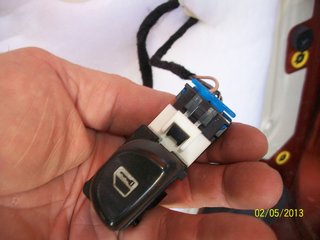 Now that the panel was loose, the door handle cable, the outside mirror switch, and the electric window switch all needed
 to be disconnected. I had a little trouble figuring out how to disconnect the window switch, because the connecting tab piece is hidden. I just removed the whole switch by spreading its mounting a bit. It came right out. The outside mirror switch connection was easy to remove, as was the door handle cable.
With everything loose, I placed the door panel on a suitable work area. The panel fastening points were now visible. I broke the first fastener mount located just out of sight at the top left of the picture. I began the next step in this Chevy HHR inside door handle repair by loosening the tension spring. Make a mental note of how to attach the spring. One part goes behind the handle and the other in front. This provides the required tension.
After the spring was loose, I then clipped the tail end of the white plastic pin that holds the whole assembly together.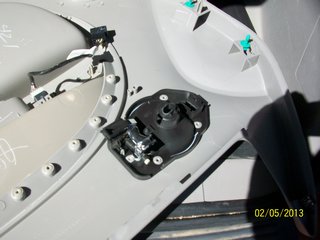 After pulling pin out everything was loose and the broken handle was removed.
Installing The New Handle
I placed the new handle and spring in their proper position and the new plastic pin inserted into the assembly. Putting a little petroleum jelly on the tip of the pin helps with its installation.It is a tight fit. Do not break anything.
Now the new handle works great. It was now time to re-install the panel. I reconnected all the switches, and the door cable. I then lined up the panel with its connectors and carefully popped the panel back on. You can use your hand for this, thereby getting a feel when the connector goes back into it proper spot. I made a fist and used the side of my hand to pop the panel in.
 After the panel was in, it was time to reconnect all the screws, door knob, and the little panel plug piece, referred to in the beginning. Now I have to purchase a new clip for the one I broke, removing the panel–maybe an update on that a little later. Finally, everything completed, it was time to test the operation. The new handle worked better than new. Time to have a frosty beverage. 😎